Moving your website to a new web host can be challenging, especially when considering all the website errors that can happen. However, it can be easy and safe once you know what to focus on and to anticipate.
For that reason, this article will list a step-by-step tutorial to make website migration easier for you. Let’s get started.
Choose Your New Hosting Provider
When choosing a new hosting provider, always aim for a new host with better scalability and flexibility in the hosting plans. You can also go for quality hosting at affordable prices, like Hostinger hosting.
Compare different hosting providers along with their plans and pricing. Make decisions based on why you needed a new host. Go for long-term investment to avoid the future migrating hassle.
Check if the new web host offers a free migration service. Having this service allows an easier transition, especially if it’s between one cPanel to another.
When you’ve settled on a new hosting provider, now it’s time to move the website. Remember to inform your website visitors that you’re moving to a new web host.
Read about web hosting for small business
Add The Domain To Your Hosting Plan
Purchase a hosting plan before adding your domain. If you feel like you’re starting to use over 50%of your resources, always upgrade to a better, more capable hosting plan. After that, enter your domain name during the sign-up process or within the control panel.
However, this process works if you only have one domain. For multiple domains, choose the add-on domain option. In cPanel, look for the Addon Domain section to start adding them.
Adding the domain to the new hosting plan ensures that your website doesn’t direct itself to the previous web host.
Download Your Website Backup Files
Before the migration process starts, it’s important to download your website’s backup files to avoid issues and keep things where they are after moving to a new web host.
Your current web host should have the option for automatic download within the control panel. If not, use File Transfer Protocol (FTP) to download the files and follow these steps:
1. Download and use FileZilla to connect to the FTP
2. Use the quick connect function to connect to your FTP account
3. Enter your website details, like the hostname, cPanel username, and password
4. Download your files
For WordPress websites, you can use multiple plugin options to help the downloading process. Check out these plugin options.
Download Your Database Files
For websites running on a Content Management System (CMS), like WordPress, you also need to download your database files. I recommend using phpMyAdmin. It’s a free and popular tool for MySQL database management.
To download your database with phpMyAdmin:
1. Go into your database via phpMyAdmin. Check out these steps to do so
2. Click the Databases on the top-left menu
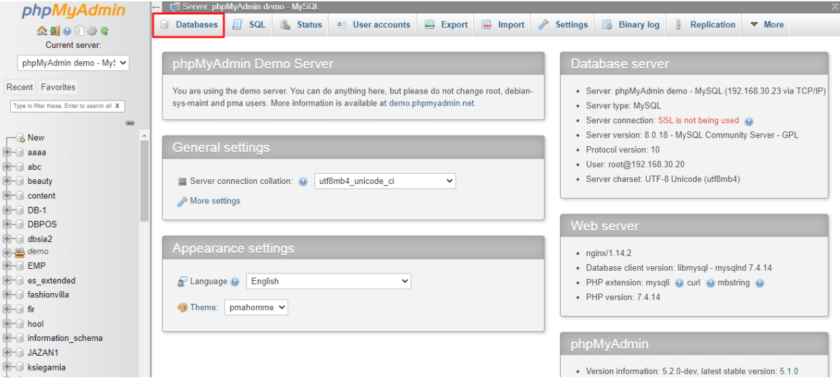
3. Choose the database to export
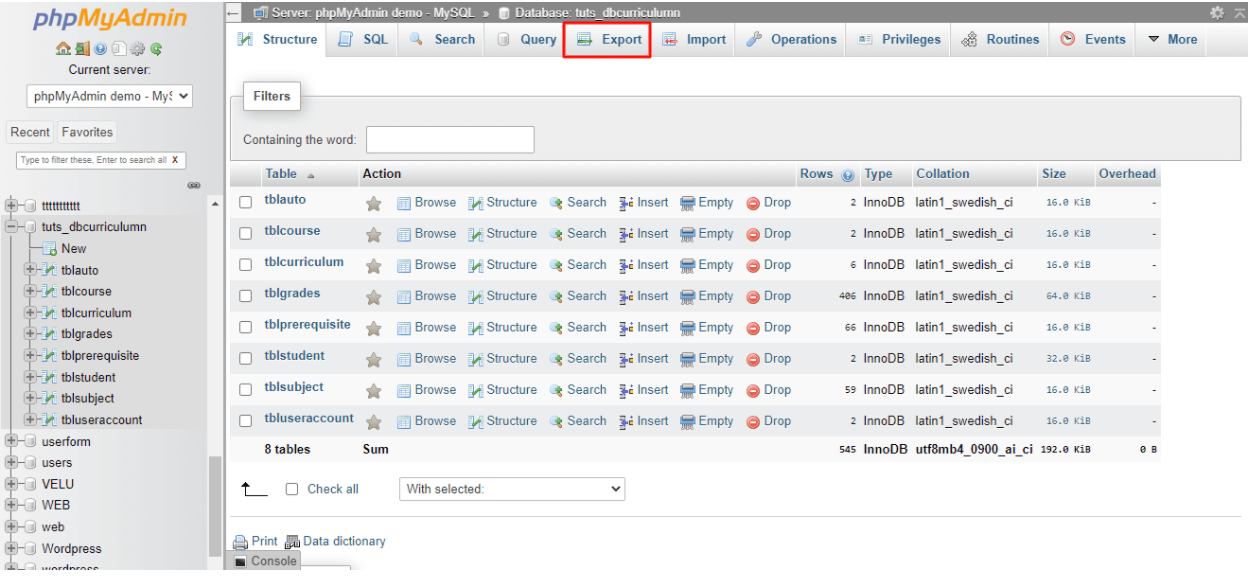
4. Click Export
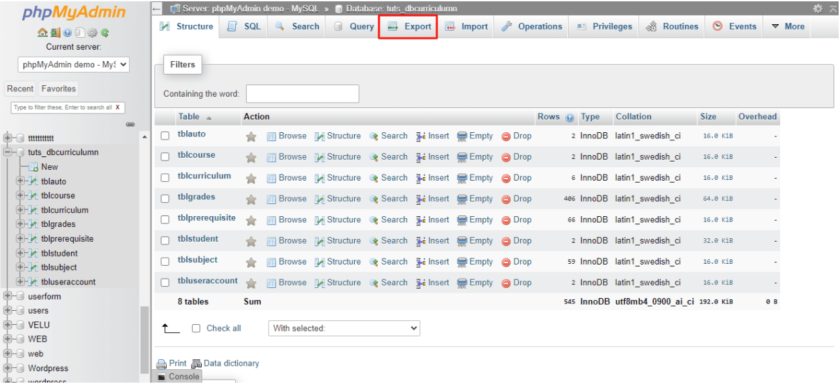
5. Choose the Custom export method to display all possible options
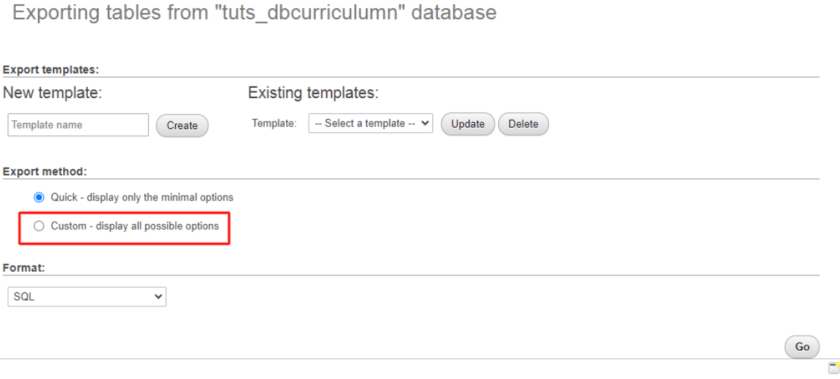
6. Choose the table to export
7. Scroll down and check the boxes under the Object creation options
8. Click Go to download the database
Upload The Website Files To Your New Hosting Account
After downloading your website and database files, now comes the uploading. Starting with uploading your website file to the new web host.
Following the same process of downloading, upload your files via FTP. The process consists of the steps below:
1. Upload your files using FTP
2. Connect your FTP account to FileZilla
3. Go to Remote Site and click the public_html folder
4. Go to the Local Site panel and locate the files you want to upload
5. Select the files and right-click to Upload to the public_html folder
When the process is complete, next comes the database upload to the new web host.
Upload The Database Files To Your New Hosting Plan
Before uploading the database files, you need to create a new MySQL database and user on your new host. Alternatively, use MySQL Database Wizard to help the process.
After that, follow the process below:
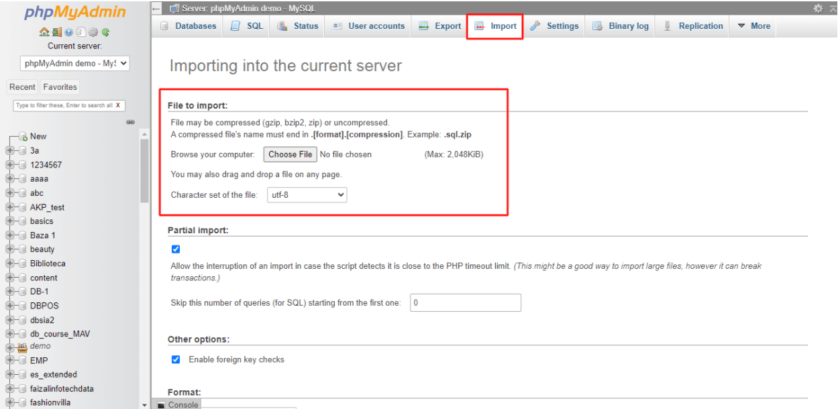
1. Go to phpMyAdmin at your new web host
2. Go to the Import page and fill out the File to import section
3. Choose the previously downloaded SQL file of your database under the Choose File
4. Click Go to upload the database files
If you encounter any error during the upload process, check out ways to solve the problem. For WordPress websites, check their support site for help.
Configure and Test Your Website
Regardless of the CMS, you’re using, you’ll need to configure and test the website to ensure everything is working. This includes details like the PHP version you’re using on the previous and current web hosts.
This configuration process is crucial for websites that use different database names, usernames, and passwords.
For WordPress websites, check out these steps to configure the database settings. For other website platforms, check out your current web host’s configuration files.
For testing, update your CMS and plugins to ensure you’re using the latest versions. You can test using a temporary URL or using a host file modification for Windows and Mac.
Point Your Domain To Your New Hosting
The final step is pointing your domain name to the new web hosting. Doing this update ensures that visitors are directed to the new server with minimal downtime. You can do the process by using the domain’s nameservers.
This method ensures that you control your domain’s DNS without changing the domain registrar and with no additional charges.
The process begins by finding the nameserver list from your new web host. Then, enter all the nameservers to the domain registrar’s control panel. However, the details differ between registrars. Go to the FAQ page of your domain registrar for more info.
Conclusion
To sum up, this article has explained the steps to move your website to another web host. The process can differ depending on your current web host and domain registrar, but they share the same core logic on each step.

